Integrated Zoom
This article covers the topic of using your own  account in our system.
This allows you to take advantage of our integrated telehealth features while still using your own Zoom account!
info Key Points in Order:
- Providers → secure your own paid Zoom account here → Zoom for Healthcare
- Ensure you have a BAA set up with Zoom → here
- Owners/Managers → enable the ability for providers to turn on Zoom here
- Providers → set up Zoom integration here
In this Article:
- Set up Zoom Telehealth
- Starting a Telehealth Session (Provider)
- Scheduling:
- Telehealth Session Requirements
- In Meeting Controls - Features
- Starting a Telehealth Session (Client)
- Disconnect Zoom Telehealth
- Error Refreshing Access Token
Set up Zoom Telehealth
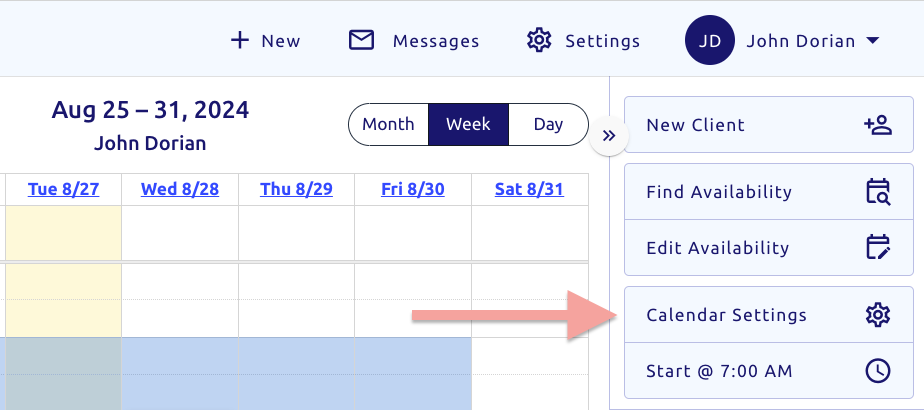
You will first need to allow Zoom integration for providers in the group.
To access, on any screen click (top right):

Using a mobile device?
Access settings using the gear icon settings (top right).This area allows an owner or manager to define practice-wide settings:

- Near the bottom, find the section Other Settings and click

- Set Allow Zoom Integration? to Yes and click
- You'll then see the green checkmark (shown above) check_circle noting Zoom integration is allowed for anyone at the practice:
Once enabled, setting this up is a quick and easy task.
As a Provider: Enable Zoom Telehealth
Once you've secured your own Zoom account here follow these steps:
- Click
- Click (right menu):
- Find the section titled Zoom Integration and click :

- Confirm the dialogue and click
- This will then bring you to the Zoom Sign in page.
- You will need to enter the credentials for your Zoom account here so we can connect:

- If you are unsure of your credentials, you can use the Forgot password?
- Issues with this? Please reach out to Zoom directly for assistance, TherapyAppointment is not able to assist for security and access reasons
- Once signed in, you should see a page reviewing the connection:

- At the bottom, click the button:

- After that step, you should now be connected and see this status in your Calendar settings:

Starting a Telehealth Session (Provider)
Once enabled, Zoom telehealth works almost identical to our other integrated telehealth solution.
To join a session, you can do so either from your Home or Calendar left menu options.
- From the , click on the appointment
- On the top blue ribbon, click the

- This will then load an initial telehealth screen. Click :

- Our system will then open a new tab in your browser with the Zoom link
- This works identical to joining any other Zoom meeting:

- From here, launch the meeting with Zoom
Setting up a Telehealth Session
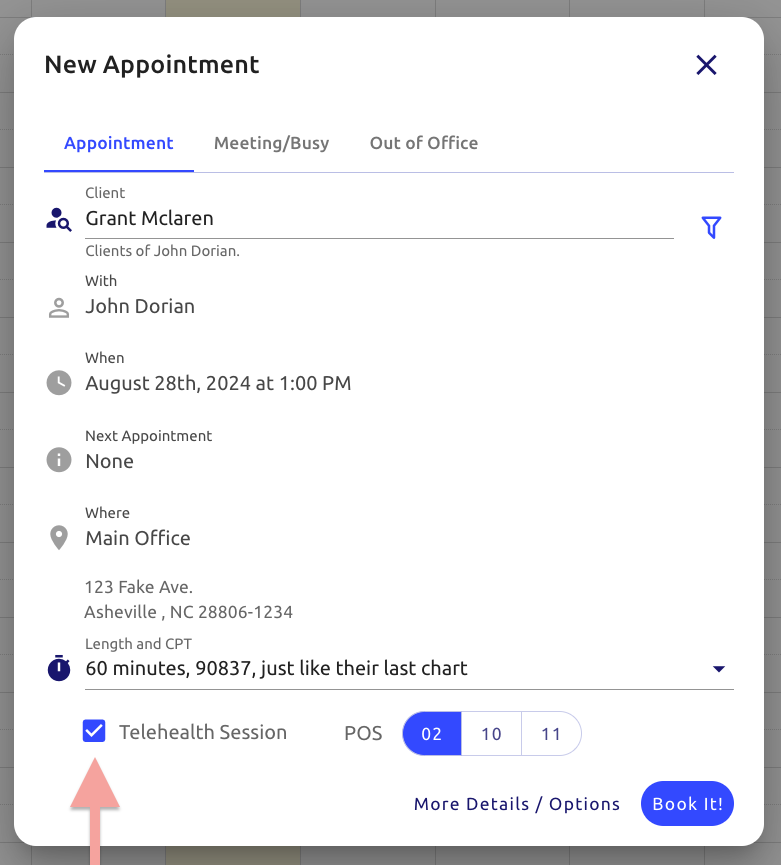
Once telehealth is setup, follow these steps to setup a new appointment with telehealth:
- Click (left menu)
- Click in the schedule on the date and time, loading the appointment popup
- Enter the client's name at the top and click on it
- Check the Telehealth session option at the bottom
- Optionally, change the POS code if needed
- Click
Update an Existing Appointment to Telehealth Session
If you have a standard appointment on your calendar and want to change it to telehealth, or vice versa, follow these steps:
- Click (left menu)
- Click on the desired appointment
- Click the Scheduling (top tab)
- Change Telehealth Session? from No to Yes
- Click near the bottom

Setting up Availability (Client Self Schedule)
If you have a practice that is 100% telehealth, or you have days of the week which are telehealth only, or even just mornings or afternoons, you will wish to limit your clients to ONLY scheduling telehealth on those days or "sections" of your availability so they do not assume this is an in-person appointment.
This may be accomplished by editing your availability calendar to limit certain days/times to telehealth only.
Article section on setting up availability: Calendar Setup
When editing availability, click on a section. To the right you can define whether or not an availability section is designated as in person, telehealth only, or both as shown below:

Then, when clients are scheduling they'd see a built in telehealth option, or can pick from either if you've defined it:
movie Video: Client self scheduling → Zoom
Beneath each date
- Blue circles Indicate telehealth
- Orange circles indicate in person
Telehealth Session Requirements
The client must have an email address and a client portal account created to access Telehealth.
Please communicate this with your client ahead of time to avoid delays. For more information about verifying this, or sending / resending a portal invite, check out our support article here: Portal Credentials
- You will also want to ensure both you and the client have the Zoom application installed beforehand.
- To download
 Click here
In Meeting Controls - Features
For more information about Zoom telehealth features while in the session, please reference the Zoom help center by clicking here
Starting a Telehealth Session (Client)
First off, clients must sign into their client portal account for Telehealth access for security reasons.
Client Sign-in options:
1. The main portal sign-in page here: https://portal.therapyappointment.com
- Works for both staff AND clients
- You can bookmark as well
2. Or from within the client portal
- Clients can find their providers on our Find your Therapist Search (click here) if enabled
Article: Find your Therapist Article - Your provider may have on their webpage or email signature a link to their own client portal.
Article: Client Portal Website Link
Having issues signing in?
- If you know your username and email address, you can easily reset your password with the steps here: Reset Password
- You'll need to contact your provider or their office staff for assistance.
- For your account security and privacy reasons, TherapyAppointment support staff cannot directly assist clients with account or login issues. We give your providers all the tools they need on their end to assist and help you manage your account. Providers with issues related to this can reach out to us directly and we can assist!
- Providers → confirm your clients have an account with the steps here
Steps to Join the Telehealth Session
You're now logged in and on the dashboard, almost there!
movie Video: Join telehealth session (as a client)
- This brings you to the initial loading screen with a spinning blue wheel

Once your provider has joined the session:
- The screen will refresh with a button to join the session
- Click

- Our system will then open a new tab in your browser with the Zoom link
- This works identical to joining any other Zoom meeting
- From here, launch the meeting with Zoom as you normally would
Telehealth Reminders
Approximately 15-30 minutes prior to a Telehealth appointment, clients will - in addition to the standard reminder 1-5 days before - automatically receive a text and an email explaining a Telehealth session is beginning soon and to login to their client portal account.
mail Telehealth Reminder Email:

phone_iphone Telehealth Reminder Text (also supports voice):

Disconnect Zoom Telehealth
To disconnect your Zoom account, follow these steps:
- Click
- Click (right menu):
- Find the section titled Zoom Integration and click

- Your Zoom account will then be disconnected from your account
Error Refreshing Access Token
Receiving an error message similar to this?
After investigation, this is a common issue with Zoom integrations, especially when one person tries to use the same Zoom account on multiple accounts.
Using one paid Zoom account per provider should resolve this issue.
Is this not the case?
- If so, the only suggested guidance we've received from Zoom is to disconnect and reconnect your Zoom account within TherapyAppointment, and we've made it easy
Follow the steps below to fix this:
- Click
- Then click (right menu)
- Find the section Zoom Integration and click refresh refresh (top right of section):
