Integrated Telehealth in TherapyAppointment
sticky_note_2 Note:
- We recommend using our telehealth application for the best experience
- If not, we recommend using the Google Chrome browser for the best experience
Telehealth allows a provider to remotely see clients for a session securely and easily by using their computer's microphone and camera for either a 1:1 or group session.
In this Article:
- Enabling Telehealth
- Setting up a Telehealth Session
- Update an Existing Appointment to Telehealth Session
- Telehealth Session Requirements
- Starting a Telehealth Session
- Telehealth - Client View
- Other Things to Consider:
More info:
- Telehealth - Layout & Features (for in-meeting controls)
- Telehealth - Sign in as a Client
- Additionally, please also visit our Telehealth Support page if you are a provider looking into best practices or things to consider when deciding to incorporate virtual therapy sessions.
Enabling Telehealth
From any screen:
- Click on your name (top right)
- From the popup, underneath your name and practice click

- Find the section Roles
- Then find the Therapist → Telehealth line
- Click (far right) to enable Telehealth for this therapist

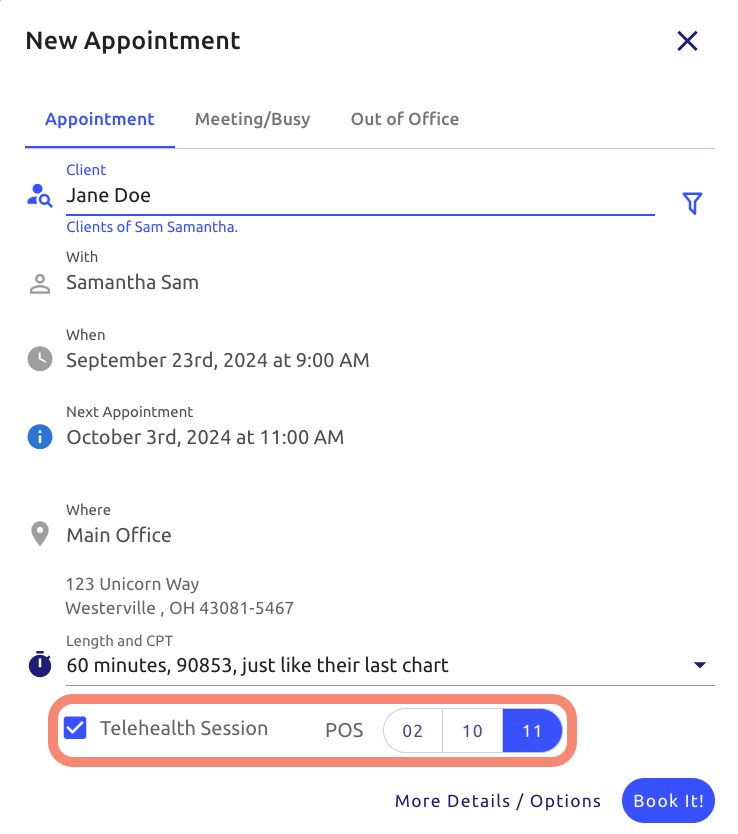
Setting up a Telehealth Session
- Click (left menu)
- Click the desired date/time, bringing up the appointment popup
- Enter the client's name at the top
- Check the check_box Telehealth Session option (bottom left)
- Click
Update an Existing Appointment to Telehealth Session
If you have an existing standard appointment on your schedule and would like to change it to a Telehealth session, perform the following steps:
- Click (left menu)
- Click on the appointment you want to edit
- Click Scheduling (top tab)
- Change Telehealth Session? to Yes
- Click (bottom right)

Telehealth Session Requirements
Please ensure ahead of time the client has created an account, if not send them an invite.
To verify if a client has setup their client portal account, check this article: portal credentials
Starting a Telehealth Session (Provider)
Starting a Telehealth Session (Client)
Client Notifications
In addition to the standard reminder(s), approximately 15-30 minutes prior to a Telehealth appointment, clients will automatically receive a text and an email explaining a Telehealth session is beginning soon and to login to their client portal account, then click join to launch the session.
✉️ Telehealth Reminder Email:

📲 Telehealth Reminder Text (also supports voice):

⚠️ Ensure Availability is Setup for Client Self Scheduling
If you have a practice that is 100% telehealth, or you have days of the week which are telehealth only days, you will wish to limit your clients to ONLY scheduling telehealth on those days or "sections" of your availability so they do not assume this is an in-person appointment.
This may be accomplished by editing your availability calendar to limit certain days/times to telehealth only, from our article on setting up availability: Calendar Setup
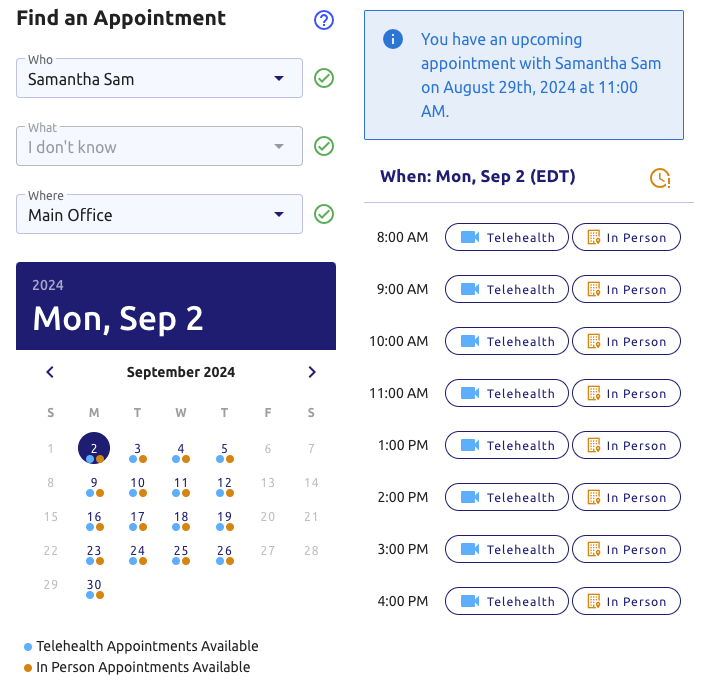
When you click on an availability section, you can define whether or not an availability section is designated as in person, telehealth only, or both as shown below:

Then, when clients are scheduling they'd see a built in telehealth option, or can pick from either if you've defined it:
Telehealth Waiting Room - Setting
The default setting is a disabled waiting room, meaning clients would join without any assistance from you and can just join the session without any warning.
To enable the waiting room option for all telehealth sessions, go to:
- Click your name (top right menu)
- Then
- Are you an owner or manager? Switch to another provider's profile using the dropdown below the tabs
- Click Client Portal (top tab)
- Find the top section Client Portal Settings
- Click (far right)
- Change Enable telehealth waiting room? to Yes and click

Clients will now be automatically put into the Telehealth waiting room when they join each session for that provider. You will need to admit them into the session when they join.
- This will come as either a popup:

- Or within within the Participants menu (bottom right):

More info:
- Telehealth - Layout & Features (for in-meeting controls)
- Telehealth - Sign in as a Client
- Additionally, please also visit our Telehealth Support page if you are a provider looking into best practices or things to consider when deciding to incorporate virtual therapy sessions.