Client Registration Process
Allow potential clients to register:
- From your personalized client portal link on your own website
- Allow clients to find you with our find your therapist feature
- Or send them an email invite
Types of registration:
If enabled this will allow clients to self register with you. This can be either by:
- Your own self registration link you could use on your website or email signature for example
- Your find your therapist feature
This occurs when a staff member either:
- Creates a new client and opts to send an email invite
- Sending a manual invite from the client profile
Both types of registration are almost identical in the steps that we'll break down below:
In this Article:
- Customize Registration
- Staff-Created Registration Invites: Client View ("invite only")
- Public Registration Process: Client View (steps below)
Customize Registration
To enable and customize the intake registration process:
- From any screen click your name (top right)
- From the popup, underneath your name and practice click

- Click Client Portal (top tab)
- Find the third section titled Client Registration
- Click (top right):

Here you will find namely two sections based on the way the client has been created in the system:
language Public Client Registration:
Those that have found you either from your unique portal link or find your therapist. Article here.
forward_to_inbox Invitation-Only Client Registration:
Those that have been sent an invite by a staff member to create their account. Article here.
edit_note Edit Settings:
To change these settings, click (top right of section)
Registration has the following options:
how_to_reg Whether or not public registration is allowed
- Invitation only (by staff) will always be enabled
medical_information Ask clients to provide insurance information
- Options: Yes or no
id_card Ask clients to provide a photo of their insurance card:
- Options: don't ask, optional, or required
credit_card Ask clients to provide a credit card (requires integrated card processing)
- Options: don't ask, optional, or required
- Integrated credit card processing
description Ask clients to complete assigned forms
- Options: don't ask, optional, or required
- Online Forms: Overview
- PDF Forms
id_card Ask clients to provide a photo ID
- Options: don't ask, optional, or required
Set credit card to required and client can't add their card?
They won't be able to fully proceed to the client portal until they sucessfully add a card.
If they are having difficulties, you can either:
- Sign into your card processor portal that may contain more details for that specific transaction
- Any further hangups, the client will need to reach out to their credit card financial institution to correct this: they are the ones that make the decision to accept/deny a card, TherapyAppointment & the card processor simply pass the message along coming from the bank
Want your client to be able to register without a card?
You can temporarily set requiring a credit card to optional and toggle back to required once they complete registration. They will be able to skip that screen.Configure the settings as you wish, then click

Set any sections to required?
If so, clients won't be able to proceed until they complete the required fields. If not entered, we show an alert at the bottom if the client tries to proceed and also highlight the required fields above it in red.Staff-Created Registration Invites: Client View
When you either:
- Create a new client and check off the bottom left option send client portal invitation
- From the client profile right menu, click (article here)
Here's the path they'd follow in the system:
movie Walkthrough Video:
Steps
- The client would receive a similar looking email from no-reply@therapyappointment.com

- Clicking will bring them to this page, asking for their date of birth in mm/dd/yyyy format:
- Issues with that? Check our common hangups

- From here the system will ask them to set up their:
- Username → for signing into the client portal
- with that + their email address, a client can reset their password on their own
- for that reason it's recommended clients make note of this
- must be between 6 - 64 characters
- Password → must have all four of the following:
- At least 12 characters
- One UPPER case letter
- One lower case letter
- at least one number
- Passwords must also match
- Username → for signing into the client portal

- Once all those criteria are met, click the now blue Continue at the bottom
- Clients would then start at step 3 below
- They'll have certain information like name, gender, dob, phone & email, and address filled in based on what you or your staff have entered
Public Registration Process: Client View
Once the public client registration setting from above is enabled any potential client will be able to select on your personalized client portal link (shown below):
Article:

Once the client clicks , the client enters the registration process described below.
Clients registering in the portal are guided by a "registration wizard."
They will complete each "section" of the process as listed in the progress bar at the top of the window, shown below:

Click on the links below to take you to that registration section, or just keep scrolling down for the registration process in order:
- Appointment details (optional)
- Verify Your Identity (required)
- Registration details (demographics)
- Insurance information (if enabled)
- Credit Card (if enabled)
- Online Forms (if enabled, for auto-assigned forms to be completed)
- Confirmation page, to review & complete registration
Below is an example of the first page the client will see when booking an appointment as a never-previously registered client:

We break down self-scheduling by client status. Setting new status clients specifically to not be able to schedule online, but allow public registration skips this step 1 below entirely.
This setting is found under Your Profile (top right initials) → Client Portal (top tab) → under the last Online Scheduling section click (far right)
Step 1: Select an Appointment Time (optional)
This screen allows a client to pick an appointment.
Clients work left to right, picking the:
- What: Appointment type (not sure? click "I don't know")
- Where: Location of the appointment
Once the details on the left are set, the client can select from an available date and times based on your availability calendar.
Article: Availability Setup
Clients not wishing to schedule an appointment at this time may skip this step by selecting with the bottom right button .
Step 2: Verify Your Identity
Next, we need to verify the client's identity by either:
- Text

- Enter either your phone number or email, and click
- Then enter the verification code:

Once entered, click
Step 3: Register (Demographics)
Here clients enter demographic information, among which we ask for:
- Name (First, Middle, Last, Preferred)
- Date of Birth
- Gender
- Username for signing into the client portal
- with the username + email a client can reset their password on their own
- Must be between 6-64 characters
- Password (requirements below)
- Must be at least 12 characters long
- At least one uppercase letter
- At least one lowercase letter
- At least one number
- Phone number (can also configure reminders)
- Email (can also configure reminders)
- Address
- Emergency Contact
- Reason for appointment (visible to office staff)
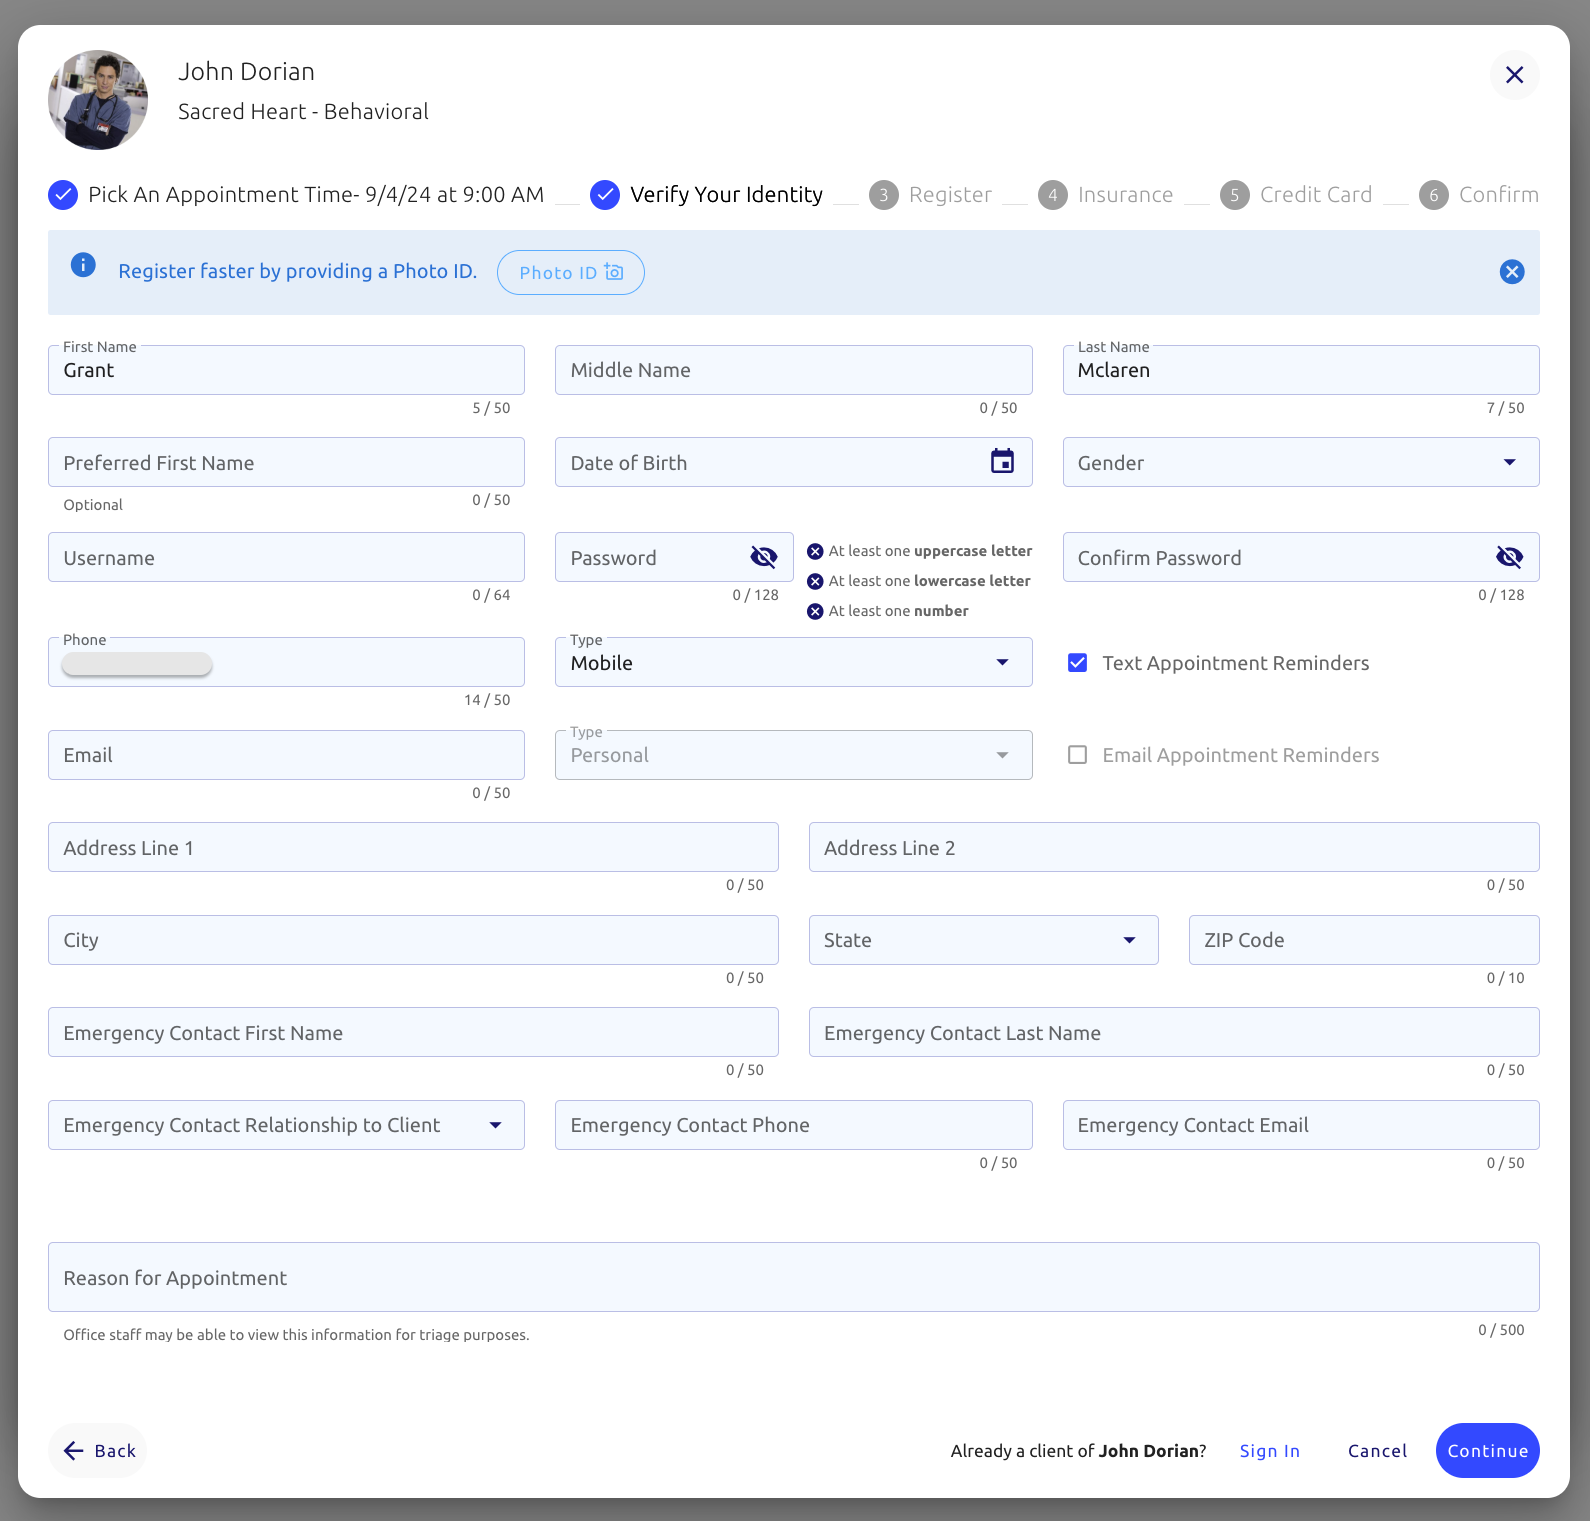
Photo ID can be set to optional or required.
Using machine learning, TherapyAppointment will automatically pull the full name, DOB, and address to automatically fill in client details and providing you with a copy of their photo ID:

Once complete with that, click
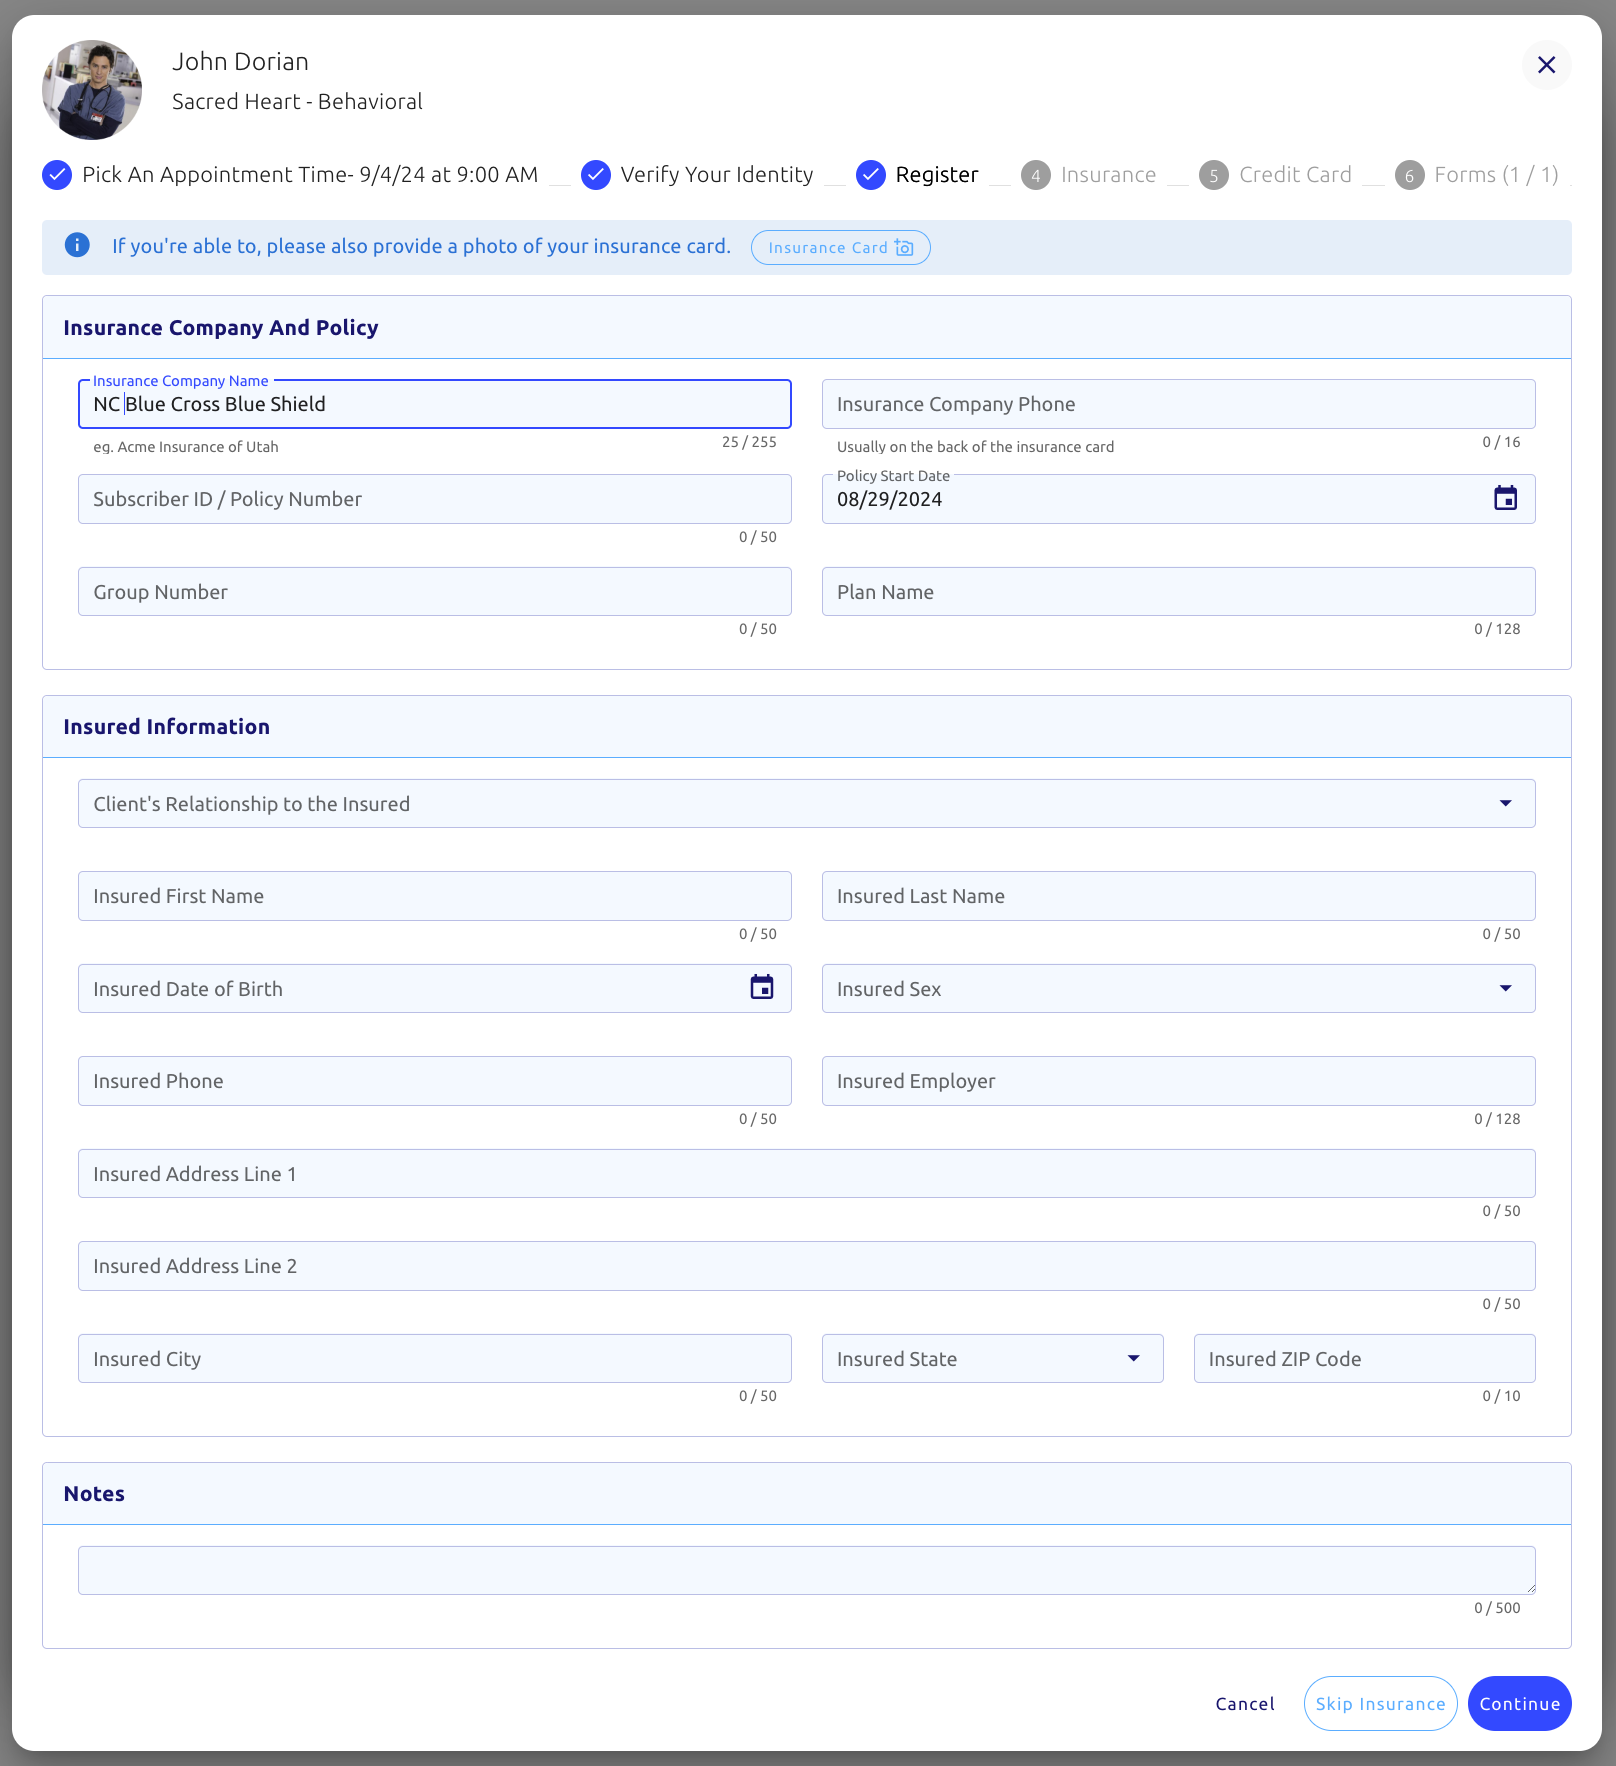
Step 4: Insurance (optional)
If your setting Ask clients about their insurance coverage? is enabled, clients will be prompted to enter their insurance information.
This can be set to optional or required.
The system does not automatically "scrape" data off insurance cards as it does with photo IDs due to complications and varying formats
Step 5: Credit Card (Optional)
If your setting Ask clients to enter credit card info at registration? is set to Optional or Required, clients will be prompted to enter a credit card to save on file.
Additionally, if you set credit cards to required and a client doesn't have one on file, they'll be redirected to this page after signing in before bringing them to the dashboard.

If they are having difficulties, you can either:
- Sign into your card processor portal that may contain more details for that specific transaction
- Any further hangups, the client will need to reach out to their financial institution (bank) to correct this: they are the ones that make the decision to accept/deny a card, we and by extension the card processor simply pass the message along
Step 6: Online Forms (Optional)
If you have online forms or standard client documents set to auto-assign, and set to ask clients to complete those forms as a part of registration (optional or required), here we will take clients through the process of completing those forms.
Here's an example of a form during registration:

Step 7: Confirm
The client will be shown an overview of their appointment and asked to confirm:

When finished, click (bottom right).
Clients will be directed to this page:

🎉 Success!
The registration process is now complete!
To access the client portal dashboard, clients would click the button (center or bottom right).
Going forward:
Clients can reset their own passwords knowing only their username + e-mail address: Reset Password - Any System UserRegistration: Common Hang-ups
Receiving an "invalid link" error?
Invite links for clients are valid for 48 hours for client security.
Simple fix! Your office will just need to re-send the invitation in the client profile, article: Portal Credentials
Date Of Birth Not Working?
- TherapyAppointment compares the DOB with what's on file with the client's profile
- This is done for both privacy and security reasons
- Clients will need to enter it exactly as shown on the profile.
- Formatted syntax: mm/dd/yyyy → this includes all 0's and the full 4 numbers for the year
- Example: January 15th 2000 would be 01/15/2000
- Anything other than this it will fail validation
- Formatted syntax: mm/dd/yyyy → this includes all 0's and the full 4 numbers for the year
- If your client is reporting issues here:
- First ask them the DOB they are entering, then compare it to what's in their profile:

If you need to change the client's date of birth, click the edit button at the top right of the section shown above.
Client Interrupted in the registration process
Depending on how far they made it into the registration process, you may be able to resend them the portal invitation so they can resume where they left off.
- Search for the client, and if found, follow the steps here: Client Portal Credentials.
- If the client is not found in your clients list, ask them to start again, or consider creating them & sending an invite, steps here.