Client Profile
The client profile holds things like client demographics, referral source, emergency contacts, as well as insurance plan information. This is one of the most-used screen in the system.
In this Article:
Client Profile: Sections
double_arrow Right-hand Menu: Click here
Send portal invite, reset password, delete a client, unlock a disabled client portal account, reminder & login history, two-factor status, client face sheet (PDF), timezone and creation details
Access the Client Profile
To navigate to the Client Profile, go to:
- (left menu)
- Click on the client's name
Note: you can also use filters on the right to narrow down your search.
For our article on the Clients List click here.
- You will then be brought to the client Profile page:
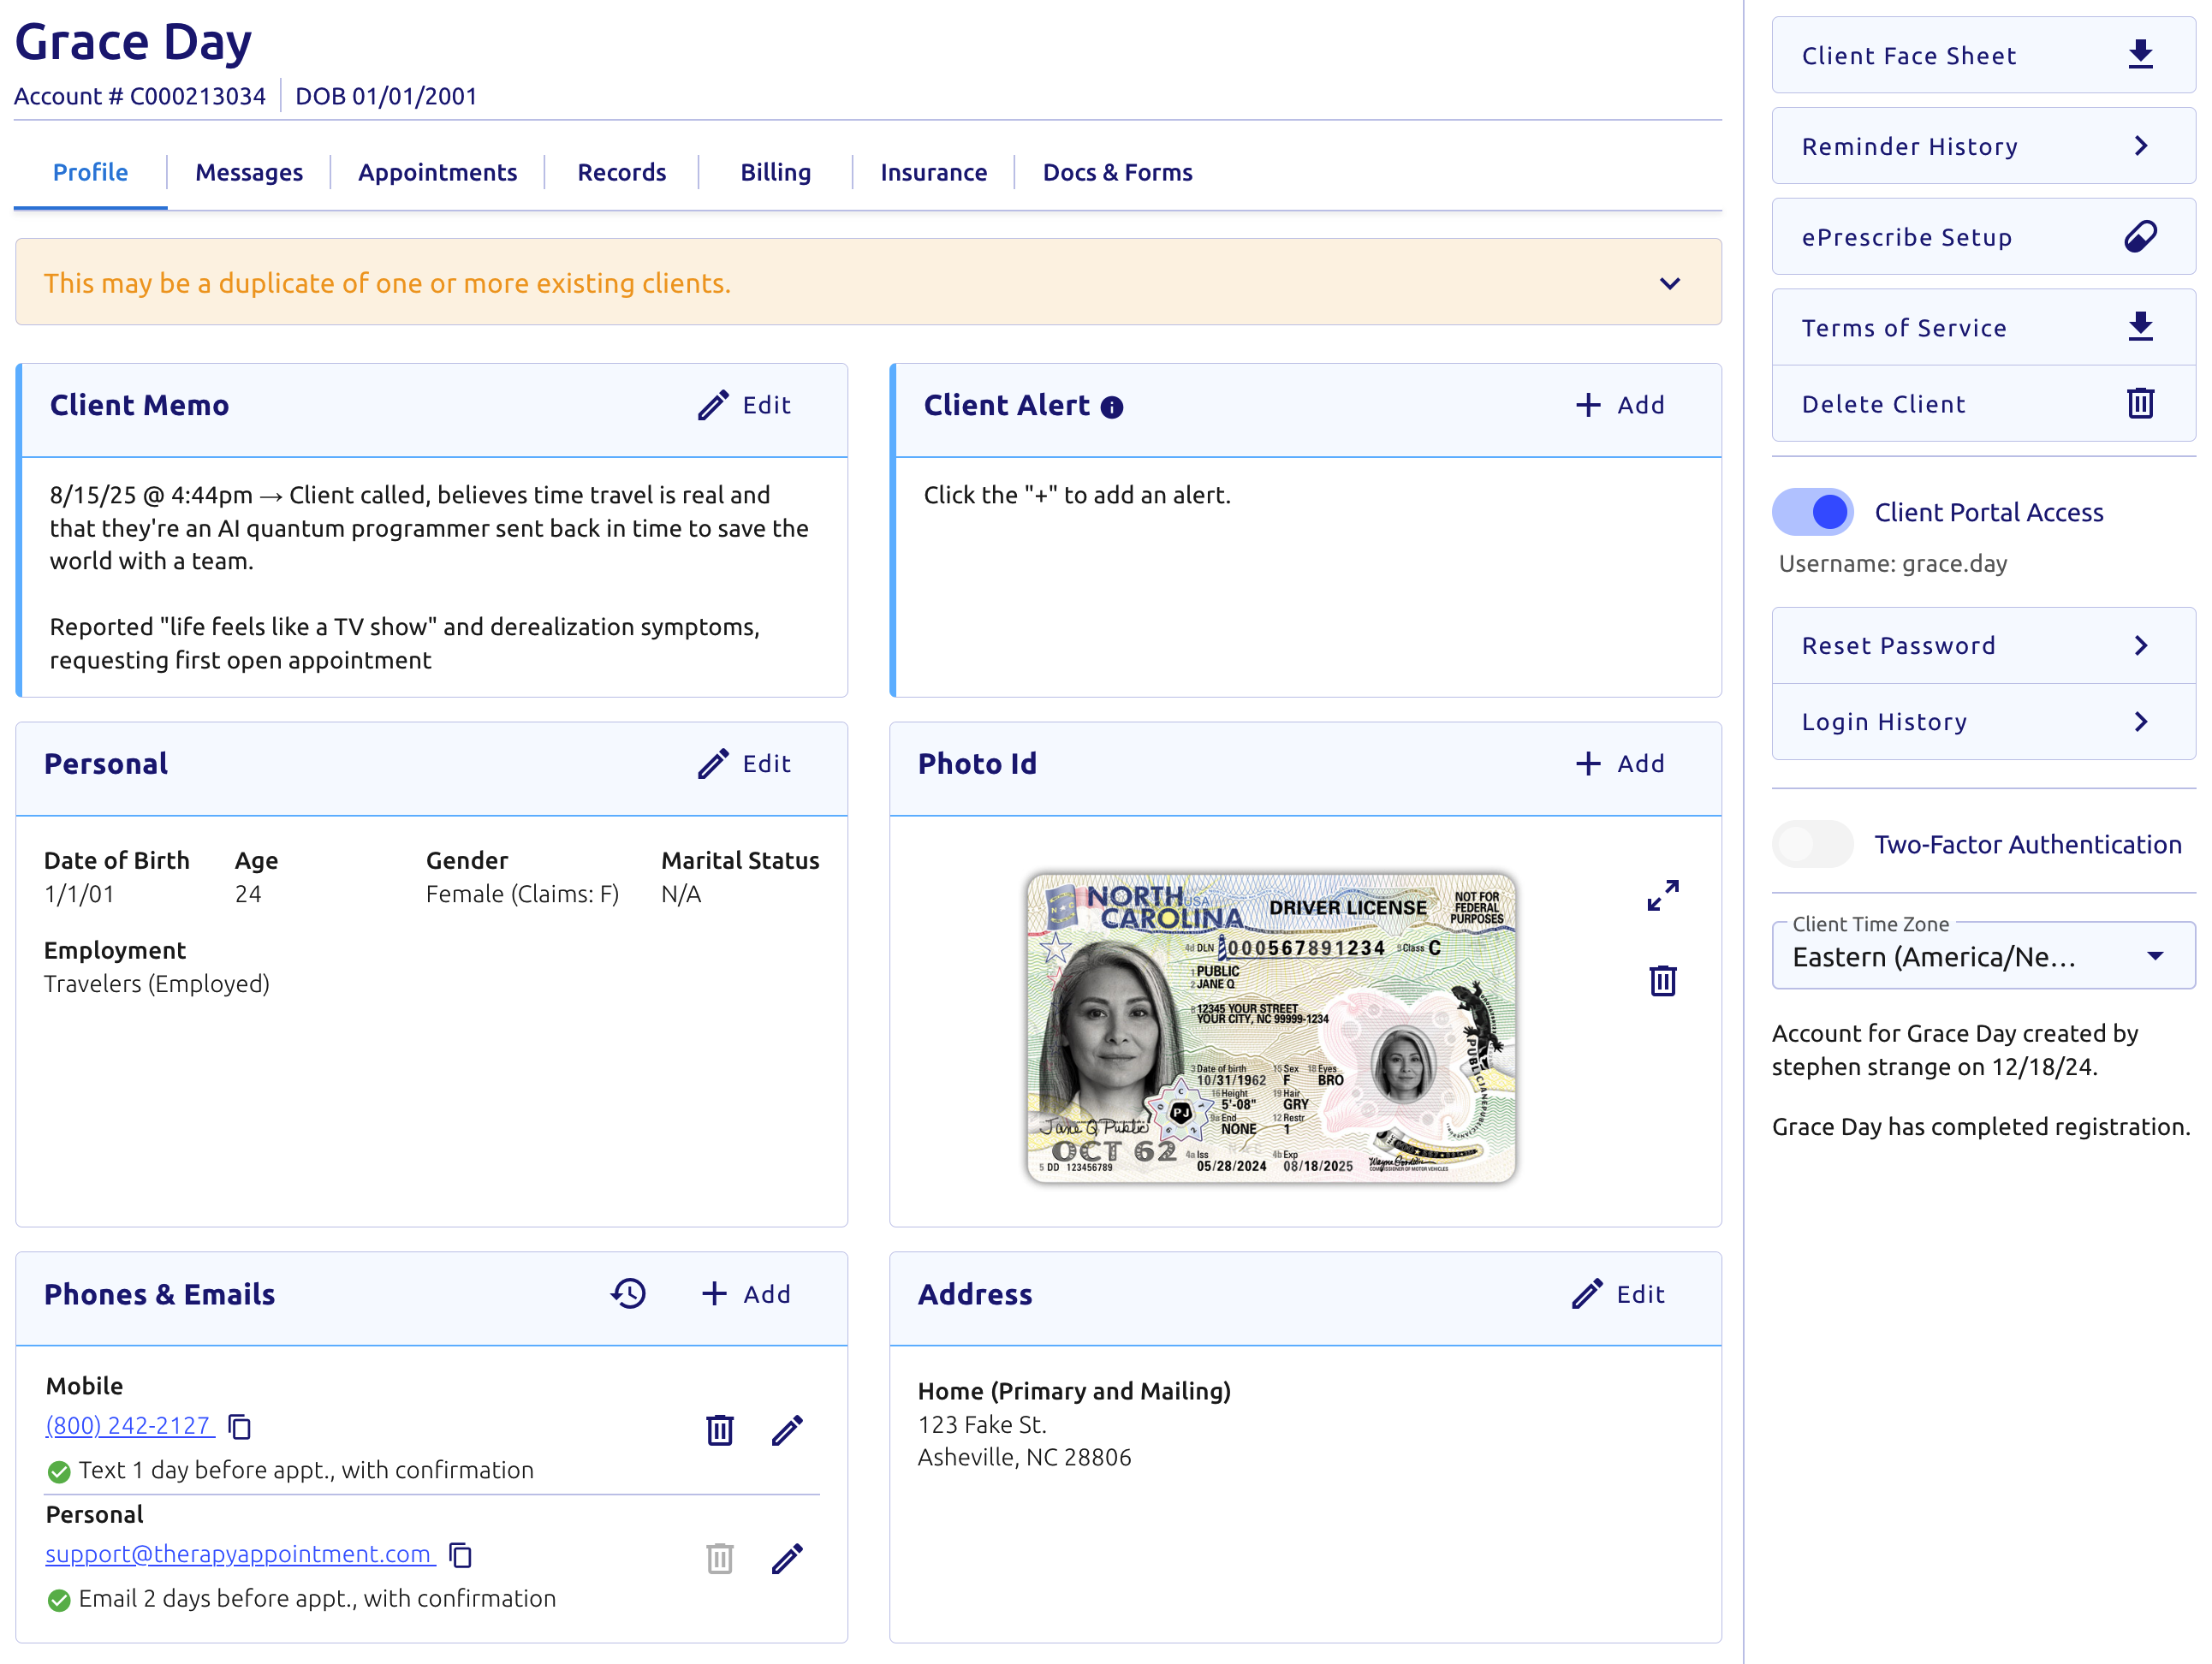
At the top left of the client profile you'll see the client's unique account number and date of birth
Beneath that, each of the tabs for each client's profile.
The next sections go down the profile in order, or you can use the top menu to quickly locate your desired section.
Client Memo & Alert
This (alert) appears in various areas of the system like the dashboard, schedule, and client list, as well as the client profile (both):

Article: Client Alerts and Memos
Personal Information (Demographics)
On the client's profile page you may edit basic demographics at the top section including:
- Name
- Date of birth
- Gender
- Marital status
- Employment
- Plus any enabled Customizable Client Demographic fields enabled for the practice
Within the section, click the top right button to make changes.

Photo ID
View or upload a client photo ID, drivers license, or any form of identification needed (front & back):

- To upload a new photo ID, click (top right)
- If an ID is already uploaded, on the far right:
- Click pan_zoom to see an expanded larger view
- Click delete to permanently delete the photo ID on file
Photo ID Upload
At the next screen below, click the camera icon photo_camera to either
- Take a picture with your device's camera
- Upload a saved image

keyboard Save on typing!
Uploading a drivers license also allows you to automatically update the client name, DOB, and address!
Don't want to update that information?
Just click Do Not Update instead at the bottom right shown above. It will retain the information you already set in their profile.Phone & Email
View or update phone numbers and email addresses here, as well as reminder settings:

Article: Client Reminders (phone or email)
mail View Client Email History
Need to check the emails (including date/time) sent to a client? Failed deliveries? We have you covered here!
To see all emails sent to this client, click the clock icon history shown here:

This loads a popup that lists all emails sent to the client by the system:

If an email address fails
You'll see an orange alert shown here. Clicking the orange alert will show the email history and status for this client:

Once loaded, on the left look for the delivery failures.
Fixes / Solutions:
Oftentimes it just takes you double checking to ensure the email address doesn't contain any typos. Edit the email address on file, then resend the portal invite.
- Clients should also check their spam or trash folder, it may have arrived there
- They can also search specifically for our email address: no-reply@therapyappointment.com
Still having issues? Ask the client reach out to their email service provider to investigate. You can give your client helpful information:
- The exact date/time we attempted to deliver the email (within our tool)
- The email address we use above
That will give their email provider the information needed to investigate the cause of the failures on their end.
Address
To the right of phones & emails, you can update your client's address and optionally add a different mailing address.

Diagnosis Codes
- Providers can click edit to update the diagnosis outside an appointment with a quick note entry
- Article: Writing a Quick Note

- Hover over the diagnosis code (ie: Z63.1) to display the diagnosis description:

- Additionally, you can set the illness onset date here
- As well as 10 a-c: injured at work / in car accident / other)
Client Status
This is a per provider setting, status can be manually changed at any time for a client.
Clients entered into TherapyAppointment are automatically designated as new
This occurs with both ways clients are initially entered into the system:
- Self registration (if allowed)
- Staff created clients
- Related article: Client Registration Process

Status information is detailed below:
New
- Where clients start out
- A first session has not yet been completed for this client
- The client may or may not be scheduled for a first appointment
- For reviewing client self scheduling settings and common hang ups click here
Active
- Clients are automatically moved to here after you lock their first chart note
- You can always manually change statuses, including inactive shown below:
Inactive
Clients will:
- No longer be included in your main searches
- Won't come up when scheduling appointments
- Won't be able to send messages to you but can still access the portal
- To access, filter your client list by status and include inactive
- Only New and Active status clients are listed by default, For steps to access click here
Referral Source
- Document who or how your client was referred to your practice
- The dropdown is populated by the referral sources entered in your Practice Contacts
- Run a report for helpful insights as well

Article: Client Referral Source (and Reports)
Group Memberships
- Lists any groups the client is a member of
- Add this client to any group, or multiple groups here

Article: Groups: Creating, Scheduling, Charting, and Payments
Client Contacts
Here you can add, view, edit or delete any client contacts you have on file. This could be used for people the client knows like a parents, significant others, a close friend, etc.
This section additionally includes emergency and responsible party contact designations:

Credit Cards
- Add, view, or delete any saved card on file
- With multiple cards, a solid blue star will appear to the left of the card marked as default
- To change the default, click the empty star star of another card

Options (right side):
delete Delete the card
edit_square Edit the card (Label)
Note: Clients on the portal can add as many cards as they wish, but cannot remove the last card on file for your protection.
Article: Take a Payment
Private Pay
- If enabled, this flat rate will override any other default charge rates for all sessions
- Can be toggled on / off as needed

Article: Private Pay
Primary & Secondary Insurance
Primary & Secondary Insurance
- Add, view, edit, or delete any insurance information on file.
- Detailed Article: Modifying Client Insurance
Due to significant variation, this feature CANNOT automatically extract data from insurance cards
description Example of insurance entered:

Beneath that you'll notice:
description Benefits Confirmations and Pre-Authorizations:

Insurance Verifications
Insurance Verifications
Generate or view insurance verifications using Real Time Eligibility for participating insurance companies:

Article: Insurance Eligibility Verification
Right-hand Menu
- To the right we have a menu with quick actions:
- On mobile? Click first to reveal the menu
Example profile:

- Client Facesheet → view / save / print a PDF of the client's demographics & insurance
- Reminder history
- Signed Terms of Service
- Delete the client
- Send a portal invite to a client → if already set up, it's replaced with send a password reset
- Login history (client portal)
- Managing individual client portal access
- Toggle switch: blue = enabled, grey = disabled
- Client username lookup
- With the username & email address on file, clients can reset their password on their own with the steps here
- 2 Factor Authentication (toggle switch: blue = enabled, grey = disabled)
- Client's time zone setting
- Client creation log: Who added the client to TherapyAppointment and when
- Their overall registration status
- For a more comprehensive registration status lookup, check out our handy intake tool
lock Client locked out of the portal?
If your client is locked out of the portal due to too many invalid login attempts, near the bottom of the right hand menu click shown here:
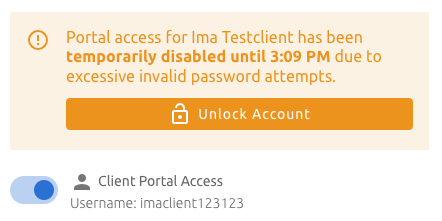
We also suggest confirming the username with the client (shown below the alert). With just that and their email address on file, they can reset their password on their own with the steps here.